Get Started with Cisco Spaces

This chapter provides an overview of Cisco Spaces, its features, the process flow, license packages, and system requirements for Cisco Spaces.

This chapter contains the following sections:

Overview of Cisco Spaces

Cisco Spaces is a multichannel engagement platform that enables you to connect, know, and engage with visitors at their physical business locations.

Cisco Spaces is the industry's most scalable end-to-end indoor location services cloud platform that empowers customers to achieve business outcomes at scale. With its comprehensive suite of services, it offers a robust solution for all your location-based needs.

Cisco Spaces provides solutions for monitoring and managing the assets in your premises.

It covers various verticals of business such as

  • retail

  • manufacturing

  • hospitality

  • healthcare

  • education

  • financial services

  • enterprise workspaces, and so on.

Log In

As a Cisco Spaces user, you can log in to Cisco Spaces using the existing account login credentials. The domain specific URL to log in to Cisco Spaces is https://spaces-gov.cisco/.

Cisco Federation Process

The Cisco Federation Process enables Single Sign-On (SSO) integration with external partner organizations, allowing seamless authentication while maintaining security boundaries. This system uses Cisco-Okta infrastructure to federate with external Identity Providers (IdPs).

Key benefits
  • Enhanced Security: Passwords remain with the partner domain; Cisco never stores or accesses them

  • Seamless User Experience: Single sign-on across Cisco applications

  • Just-in-Time Provisioning: Automatic user provisioning with minimal required attributes

  • Flexible Authentication Flow: Multiple entry points for user authentication

Cisco Customer Identity integration

Cisco-Okta is a unified authentication platform that enhances security and accessibility for users across Cisco Spaces applications. It serves as a common authentication layer, replacing individual application-specific identity providers (IDPs) to streamline user access and improve streamline user access and improve security management.

Legacy onboarding used separate IDPs for Cisco Spaces, which created challenges when enabling other applications. Cisco-Okta provides a common authentication interface that prevents future integration issues for non-Cisco-Okta customers. To ensure compatibility with the evolving Cisco product ecosystem, users are being transitioned to Cisco-Okta integration.

Cisco-Okta integration centralizes user authentication for all Cisco applications, ensuring consistent security policies and simplifying user management. This approach supports future scalability, enabling seamless activation of additional Cisco products that rely on Cisco-Okta for authentication.

Key attributes:

  • Provides a single sign-on (SSO) experience across all Cisco URLs for users with authorized email domains (e.g., @abc.com).

  • Replaces legacy or individual application IDPs to avoid fragmentation and complexity.

  • Supports SAML-based authentication with metadata exchange between customer IDPs and Cisco.

  • Requires mandatory user attributes in SAML responses, such as firstName, lastName, email, company, and countryCode.

  • Facilitates both authentication-only and combined authentication and authorization workflows.

Set Up SSO with Cisco Customer Identity

Enable Single Sign-On (SSO) across all Cisco applications for users in specified domains by integrating your organization’s identity provider with Cisco-Okta. This unified authentication enhances user experience and strengthens application security.

Use this task when you need centralized authentication for Cisco applications. The SSO setup is performed at the Cisco domain level, not at the individual application level, to provide consistent, secure access for all users in your organization. You will work with Cisco's SSO enablement team to exchange required metadata and certificates, ensuring that SSO functions reliably and meets organizational security requirements.

Before you begin

Ensure that the following requirements are met:

  • Identify each organizational email domain that Cisco must enable for federation.

  • Obtain the IdP federation metadata XML file. If the file is not available, collect the IdP entity ID, SSO URL, and public signing certificate.

  • Confirm whether the integration requires authentication only or both authentication and role-based authorization.

  • Confirm that your IdP supports SAML 2.0 and can return the required user attributes.


    Note


    Provide only the public signing certificate. Do not share the IdP private key.


Follow these steps to configure SSO.

Procedure


Step 1

Send the following information to the Cisco SSO enablement team at cci-ops@cisco.com:

  • Cisco Spaces account name: Name of the Cisco Spaces Federal account.

  • Organizational email domain: Email domain or domains to enable for federation.

  • Application name: Cisco Spaces Federal.

  • SSO type: SAML.

  • Authentication model: Authentication only, or authentication and authorization.

  • IdP metadata: Metadata XML file, or the IdP entity ID, SSO URL, and public signing certificate.

  • Subject NameID: Key account-linking attribute, typically the user's email address.

Step 2

In return, Cisco provides these details so that your IdP can be configured:

  • Assertion Consumer Service URI: Endpoint where Cisco-Okta receives SAML assertions after authentication. For Cisco Spaces Federal, use https://spaces-gov.cisco/api/tm/v1/account/login/callback.

  • Audience URI: Cisco entity ID used by your IdP. For Cisco Spaces Federal, use https://spaces-gov.cisco/.

  • SP Signature Certificate: Public key certificate used to verify authentication request signatures.


    Note


    Use the federation values that Cisco supplies for your organization. If the supplied values differ from values shown elsewhere in this topic, use the supplied values.


Step 3

Create or update the SAML application by using the Cisco SP details. Configure the NameID format as urn:oasis:names:tc:SAML:1.1:nameid-format:emailAddress and return the user's email address as the NameID.

Step 4

Configure the SAML assertion to return the following non-empty attributes:

  • firstName

  • lastName

  • email

  • company

  • countrycode

Step 5

If Cisco Spaces must assign access from the SAML response, request authentication and authorization. Configure the IdP to return the role value confirmed by Cisco Support. If the integration uses authentication only, manage user access and roles in the Cisco Spaces dashboard by choosing Admin Management.


Note


For authentication and authorization, the role attribute is mandatory. The role value must match an existing Cisco Spaces default or custom role for the target account.


Step 6

After you configure the SAML application, send the final IdP federation metadata XML file to the Cisco SSO enablement team. The file must contain the IdP entity ID, SSO endpoint, and public signing certificate. Cisco uses this information to complete the federation configuration.

Step 7

Open the Cisco Spaces Federal sign-in page at https://spaces-gov.cisco/ and complete the these steps:


Note


The email domain must be enabled in the federation configuration. Cisco-Okta uses the domain to redirect the user to the correct organizational IdP. User passwords remain with the organization's IdP.


  1. Click Login.

  2. In the Ciso-Okta Login window, enter an email address from an enabled organizational domain in the Email field.

  3. Click Continue.

  4. On your organization's IdP page, enter your organization credentials and complete MFA if required.

  5. Verify that the browser returns to Cisco Spaces and that the user receives the expected access.


NameID: mike@example.com

firstName: Mike

lastName: John

email: mike@example.com

Start Working with Cisco Spaces

Before you start working with Cisco Spaces ensure that you have the prerequisites mentioned in System Requirements.


Note


Initially, you must contact the Cisco Spaces support team for creating a Cisco Spaces account. You will get an invite to activate your Cisco Spaces account through e-mail. Click the Accept Activate button, and in the window that displays configure the log in credentials, and click Activate Account. You are now logged into Cisco Spaces. If you are a Dashboard Admin, you can now invite other Cisco Spaces users.

Follow these steps to start working with Cisco Spaces.

Procedure


Step 1

Log in to Cisco Spaces.


Note


You can enable Single Sign-On for Cisco Spaces.


Step 2

Connect to your wireless network and configure the wireless network for Cisco Spaces referring to the instructions in the Setup section of the Cisco Spaces dashboard.

The setup instructions are also available in the following sections of this guide:


Note


Cisco Spaces provides a universal account so that you can connect Cisco Spaces to multiple wireless networks.

Step 3

Add your team members, and assign them roles and permissions. For more information about adding Cisco Spaces users, refer to Manage Cisco Spaces Users.

Step 4

Import the location hierarchy defined in your wireless network to Cisco Spaces. For more information on configuring the location hierarchy, refer to the section Overview of Location Hierarchy.

Step 5

Monitor the Cisco Spaces domain and apps using the Monitor section.


Onboard Workflow

Follow these steps to log in to Cisco Spaces.

Before you begin

We recommend that you completed FRMOD onboarding process and have the FRMOD credentials available. For a successful onboarding experience, use your organization specific Identity Provider (IDP) by configuring the domain.

Procedure


Step 1

Complete the FRMOD onboarding process.

Step 2

Use your IDP and configure the domain.

For example, Cisco uses the frmod-cisco domain for Production onboarding and fedmod-cisco domain for staging environmemt.

Step 3

Use your organization's email address to request invite for Cisco Spaces Dashboard and Administrator Management access.

Step 4

Use the frmod-company.com email address and proceed with the activation instructions.

Step 5

Use the same frmod-company.com credentials to log in to Cisco Spaces.


What to do next

Cisco Spaces: Connector 3.0

Cisco Spaces: Connector (referred to as Connector in all subsequent references in this document) is a fully redesigned version of the Connector with the capability to efficiently manage multiple services that connect to different network devices such as Cisco Wireless controller and switches for data. The Connector platform makes it easy to add/remove new services from the cloud. It enables enhanced troubleshooting with debugging, log upload, and restart functionalities from the cloud. Connector also provides detailed metrics for each service with CPU, Memory, Connectivity and Up/Down status.

Connector is the next generation connector of Cisco Spaces that provides an enhanced user experience, architecture to support multiple services, simplicity, modularity, seamless upgrade and High Availability. Connector supports an active-active High Availability setup. Unlike the earlier releases of Connector 2.x, you can specifically configure and monitor the High Availability pair. All services and device configurations are managed at the Connector level to make it easy to pair with High Availability.

The Connector and device status is also aggregated at the Connector level from each instance for easy monitoring. Connector provides full visibility to each instance of a High Availability pair. You can view how the services are running on each instance, their upgrade status and so on. You can also perform actions on a particular instance, such as restarting of services.

Idle Timeout for Cisco Spaces

A user who is logged in to the Cisco Spaces dashboard can remain idle only for a specific time period. If inactive for 15 minutes, the user is automatically logged out of the dashboard. A notification is displayed 5 minutes before the idle timeout and the title of the browser window where the Cisco Spaces application is open changes to INACTIVE: You will be logged out in 5 mins. Any action performed on the corresponding window extends the user's session.

Contact Cisco Spaces Federal Support

To contact Cisco Spaces Federal support, you need to raise a case using the Support Case Manager.

Follow these steps to raise a support case.

Procedure


Step 1

Log in to Cisco Spaces.

Step 2

In the Home page, click the (Support) icon displayed at the top-right.

Step 3

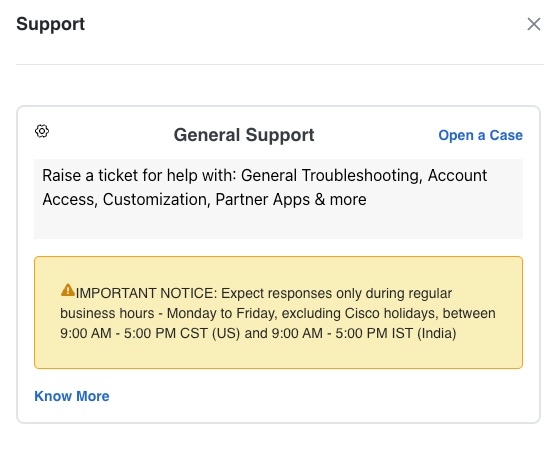
Click Support. The Support slide-in pane displays.

Step 4

In the General Support section, click Open a Case to raise a case using SCM.

Figure 1. General Support Options

Cisco Spaces Documentation

You can access the documentation for Cisco Spaces including Configuration Guides and Release Notes using the Cisco Spaces Support icon () displayed at the top-right of the Cisco Spaces dashboard.

Access these documentation support resources.

  • Help Center

  • Documentation

  • Support

  • Latest Release Notes

  • Release Notes History