Install Secure Web Appliance on VMware Esxi

Available Languages
Introduction
This document describes the steps required to install the Secure Web Appliance (SWA) on VMware ESXi.
Prerequisites
Requirements
Cisco recommends that you have knowledge of these topics:
- SWA administration.
- Fundamental networking principles.
- VMware ESXi administration.
Cisco recommends that you have:
- VMware ESXi Installed.
- Administrative Access to the VMware ESXi.
- Valid Cisco Account to Download the SWA Image file.
Components Used
This document is not restricted to specific software and hardware versions.
The information in this document was created from the devices in a specific lab environment. All of the devices used in this document started with a cleared (default) configuration. If your network is live, ensure that you understand the potential impact of any command.
VMware ESXi
VMware ESXi is a high-performance, enterprise-class hypervisor developed by VMware that allows for the efficient creation and management of virtual machines directly on physical hardware. As a bare-metal hypervisor, ESXi operates without the need for an underlying operating system, resulting in streamlined performance and enhanced resource utilization. This makes it an ideal platform for hosting various types of virtualized applications and services, providing a stable and secure environment for enterprise IT infrastructure.
This article guides you through the step-by-step process of installing Cisco Web Security Appliance (WSA) on VMware ESXi. Cisco WSA is a comprehensive web security solution designed to protect organizations from a wide range of internet-based threats by monitoring and controlling web traffic. The detailed guide covers everything from the initial setup of the ESXi environment to the configuration of Cisco WSA, ensuring that your network is safeguarded with advanced web security capabilities. Whether you are new to virtualization or an experienced IT professional, this guide provides the necessary steps to successfully deploy Cisco WSA on ESXi.
Download the Image
To download the desired and latest SWA Images, use these steps:
Step 1. Navigate to Cisco Software Central.
Step 2. Log in with your Cisco Account.
Step 3. Choose Access Downloads.
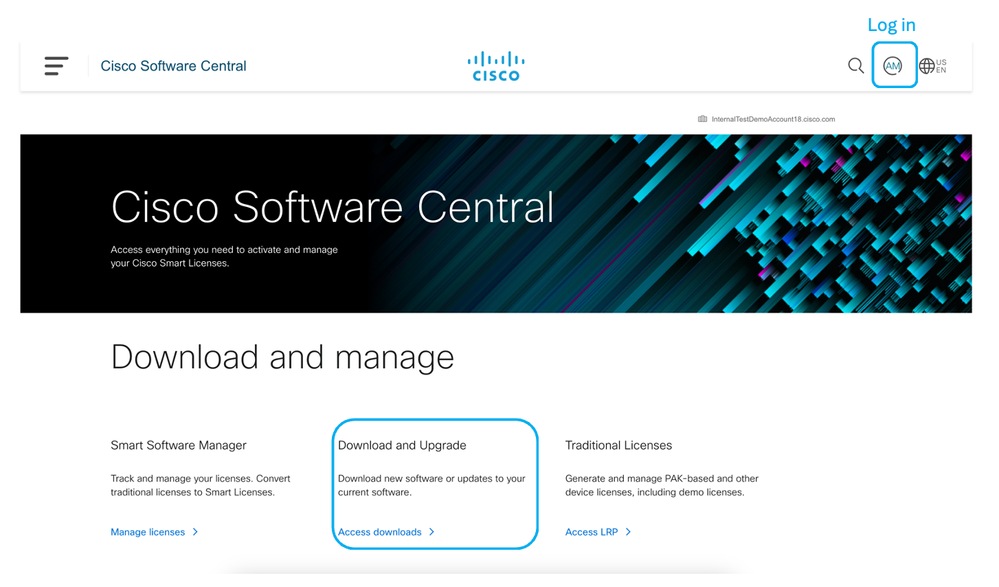 Image - Cisco Software Central
Step 4. Search for Secure Web Appliance Virtual.
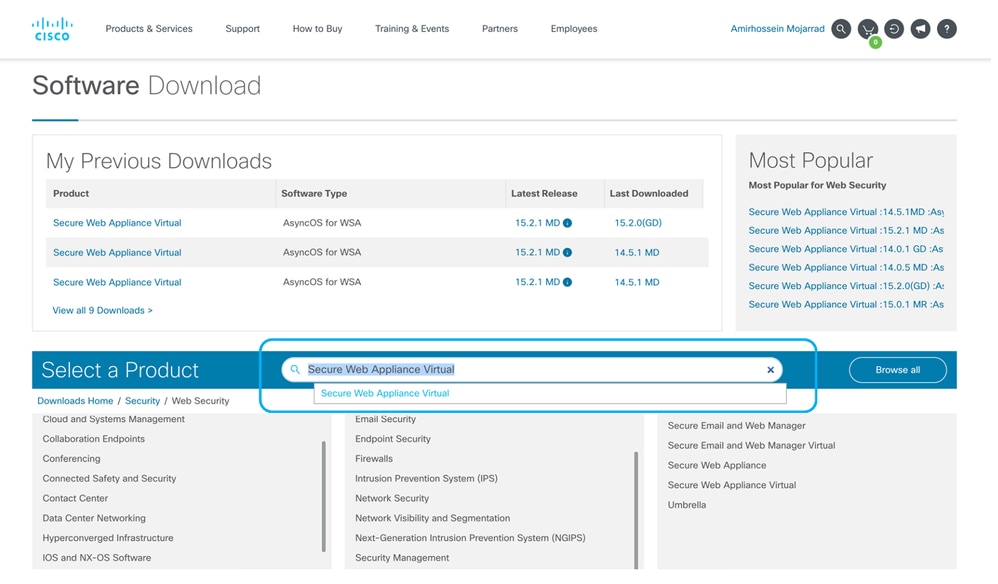 Image- Search for Secure Web Appliance Virtual
Step 5. Choose AsyncOS for WSA.
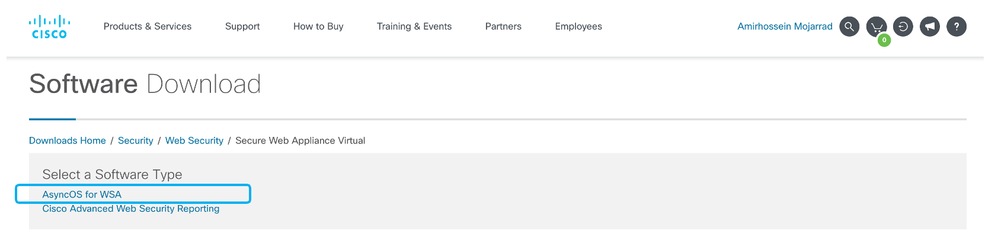 Image - Choose AsyncOS for WSA
Step 6. Choose your desired version.
Step 7. Download the Virtual SWA Image file associated with the model you would like to install.
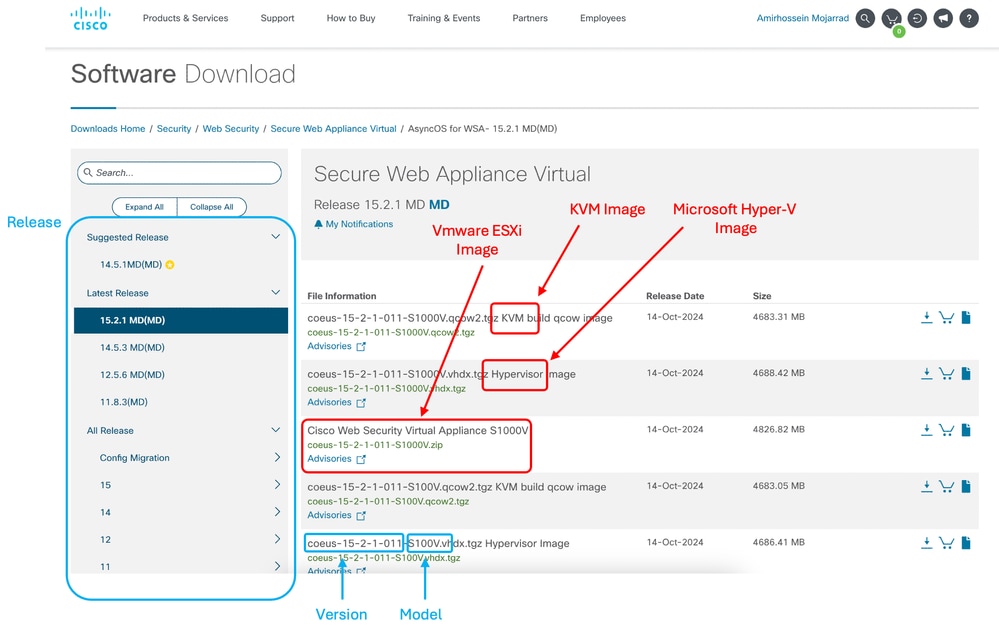 Image - Download the Image file
Installing SWA Setup
Use these steps to install the SWA on ESXi:
Step 1. Log in to the ESXi management console.
Step 2. Select Virtual Machines from the left menu.
Step 3. Choose Create / new Register VM.
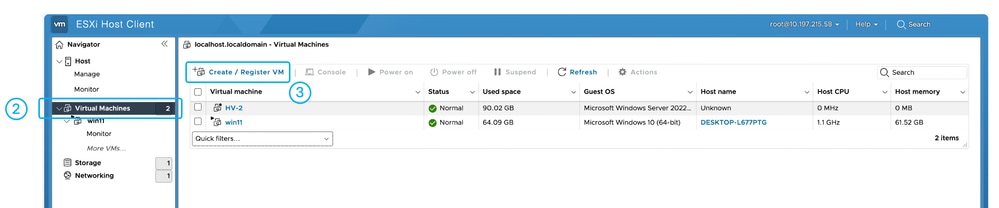 Image - Create VM
Step 4. Choose Deploy a virtual machine from on OVF or OVA file and click Next.
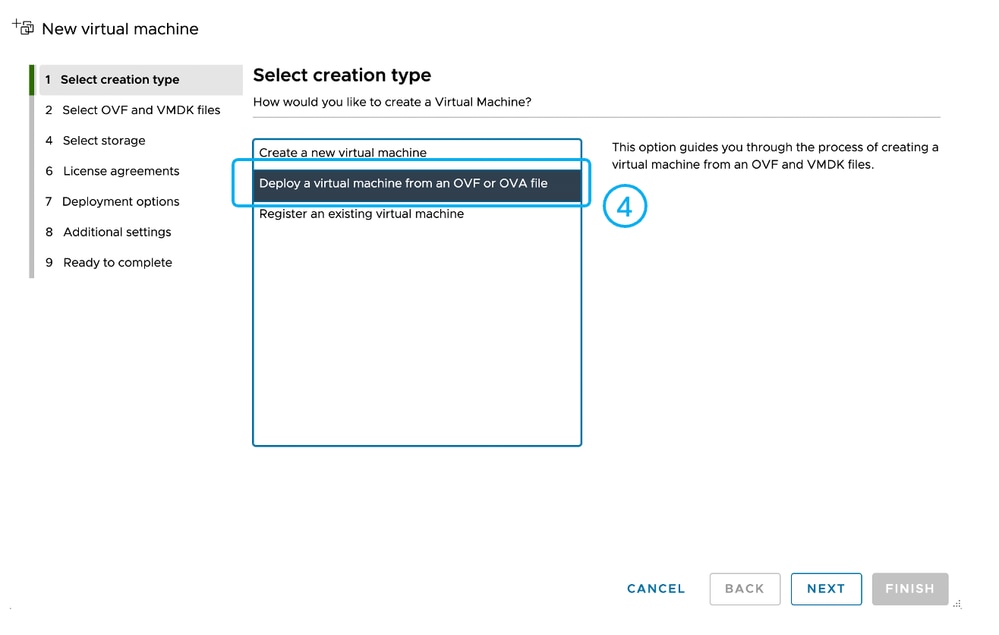 Image - Choose Deploy a VM from OVA file
Step 5. Enter a Name for your virtual machine.
Step 6.Upload the .VMDK and .OVF files extracted from the Cisco Software Download portal package and click Next.
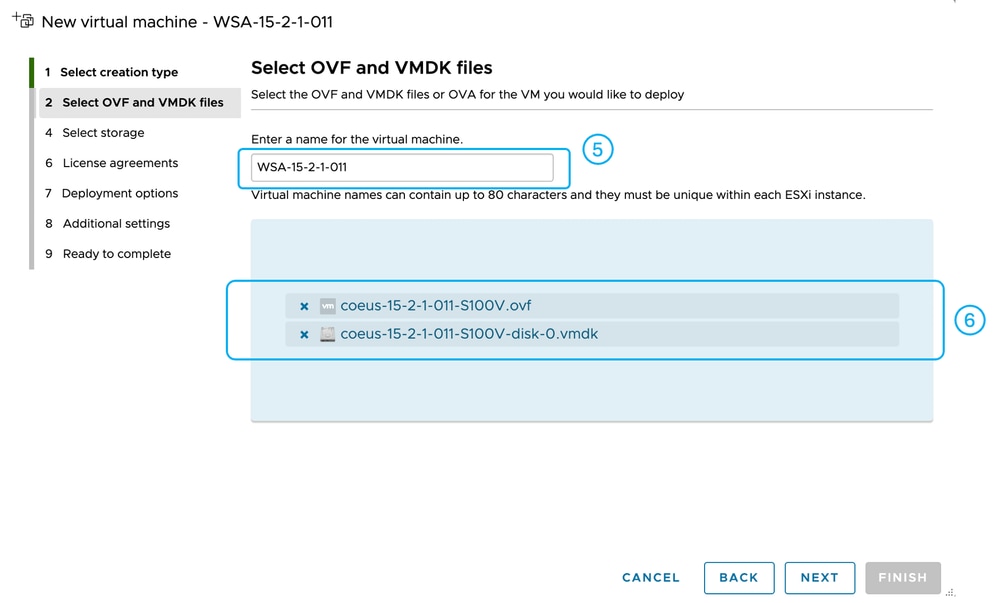 Image -Upload the OVF and VMDK Files to ESXi
Step 7. Select the Datastore you would like to host the new virtual machine files, then click Next.
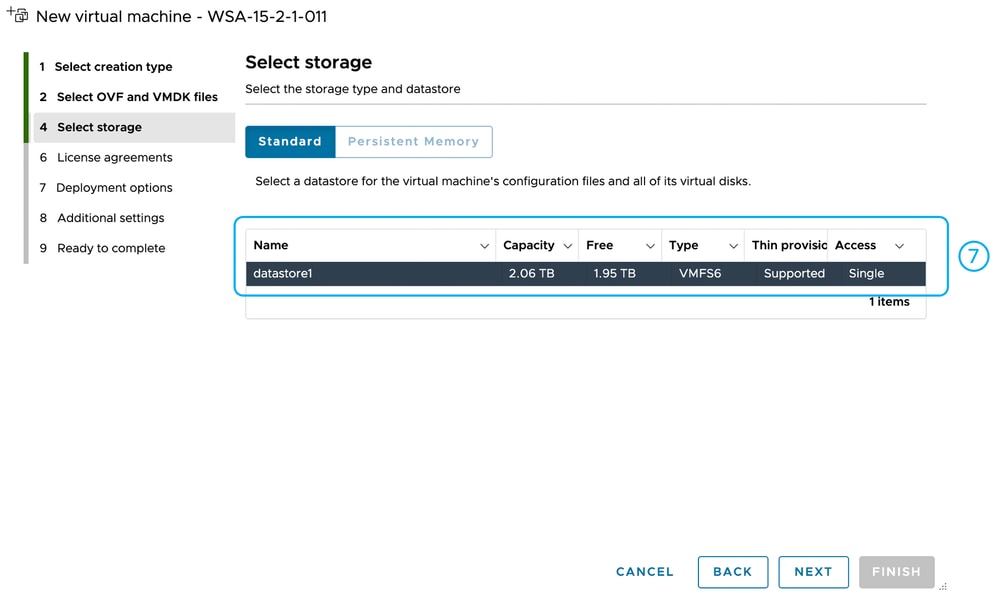 Image - Select the Datastore
Step 8. Select the desired Virtual Switch for each Virtual Network Interface Cards.
Step 9. Select Thick Disk Provisioning (is recommended for better performance), then click Next.
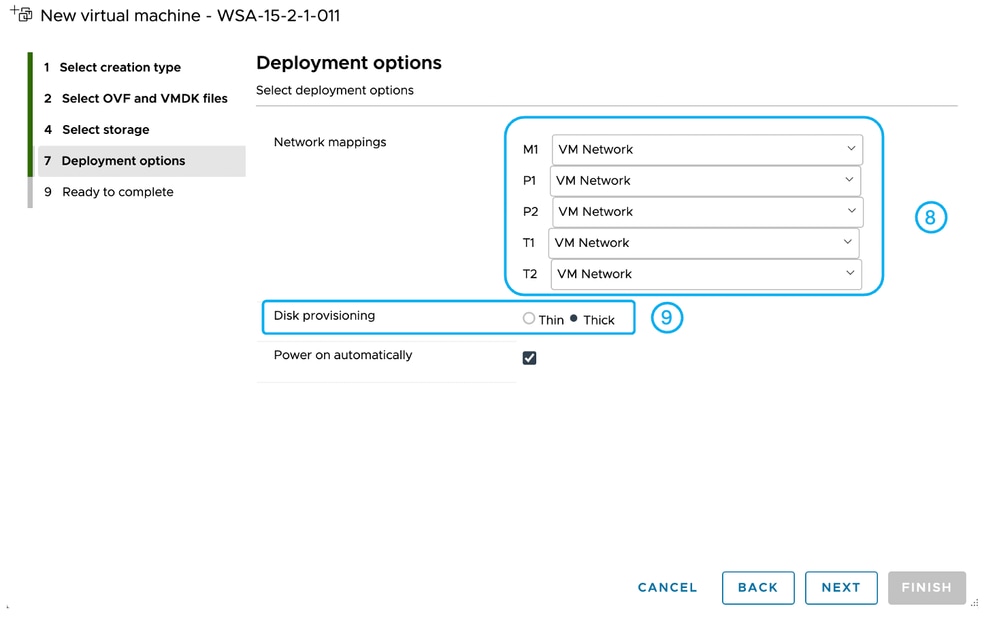 Image - Select the Virtual Switch and Provisioning Type
Step 10. Review the configuration, then click Finish.
Step 11. Wait for the tasks to finish. Review the progress from the Recent Tasks pane.
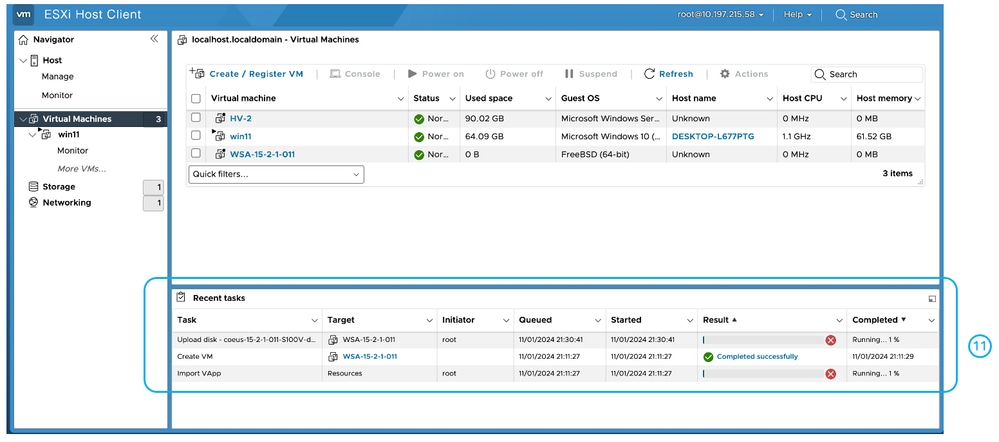 Image - Deployment Status
Related Content
User Guide for AsyncOS 15.2 for Cisco Secure Web Appliance
Cisco Secure Email and Web Virtual Appliance Installation Guide
Configure Secure Web Appliance Initial Setup
Configure Custom URL Categories in Secure Web Appliance - Cisco
Use Secure Web Appliance Best Practices
Configure Firewall for Secure Web Appliance
Configure Decryption Certificate in Secure Web Appliance
Configure and Troubleshoot SNMP in SWA
Configure SCP Push Logs in Secure Web Appliance with Microsoft Server
Enable Specific YouTube Channel/Video and Block Rest of YouTube in SWA
Understand HTTPS Accesslog Format in Secure Web Appliance
Access Secure Web Appliance Logs
Bypass Authentication in Secure Web Appliance
Block Traffic in Secure Web Appliance
Bypass Microsoft Updates Traffic in Secure Web Appliance
Revision History
| Revision | Publish Date | Comments |
|---|---|---|
2.0 |
23-Oct-2026
|
Recertification - Updated Formatting |
1.0 |
08-Nov-2024
|
Initial Release |
 Feedback
