Configure EVT-Based Identity Services Engine Passive ID Agent
Available Languages
Contents
Introduction
This document describes the new Identity Services Engine (ISE) Passive Identity Connector (ISE-PIC) Agent that was introduced in the ISE 3.0 version.
Prerequisites
Requirements
Cisco recommends that you have knowledge of these topics:
- Cisco Identity Services Administration
- MS-RPC, WMI Protocols
- Active Directory Administration
Components Used
The information in this document is based on these software and hardware versions:
- Cisco Identity Services Engine version 3.0 and higher
- Microsoft Windows Server 2016 Standard
The information in this document was created from the devices in a specific lab environment. All of the devices used in this document started with a cleared (default) configuration. If your network is live, ensure that you understand the potential impact of any command.
Background Information
This article also describes ISE-PIC Agent's advantages, and the configuration of this agent on the ISE. ISE Passive Identity agent has become an integral part of the Identity Firewall solution that uses Cisco FirePower Management Center as well.
Need for a New Protocol
ISE's Passive Identity (Passive ID) feature drives a number of important use cases that include Identity-Based Firewall, EasyConnect, and so on. This feature depends on the ability to monitor users that log into Active Directory Domain Controllers and learn their username and IP addresses. The current main protocol used to monitor the Domain Controllers is WMI. However, It is hard/invasive to configure, has a performance impact on both clients and servers, and sometimes has extremely large latency in seeing logon events in scaled deployments. After thorough research and alternative ways to poll the information required for Passive Identity Services, an alternative protocol - known as the Eventing API (EVT), which is more efficient in handling this use case was decided upon. It is sometimes referred to as MS-EVEN6, also known as Eventing Remote Protocol, which is the underlying RPC-based on-the-wire protocol.
Advantages with the Use of MS-EVEN6
High Availability
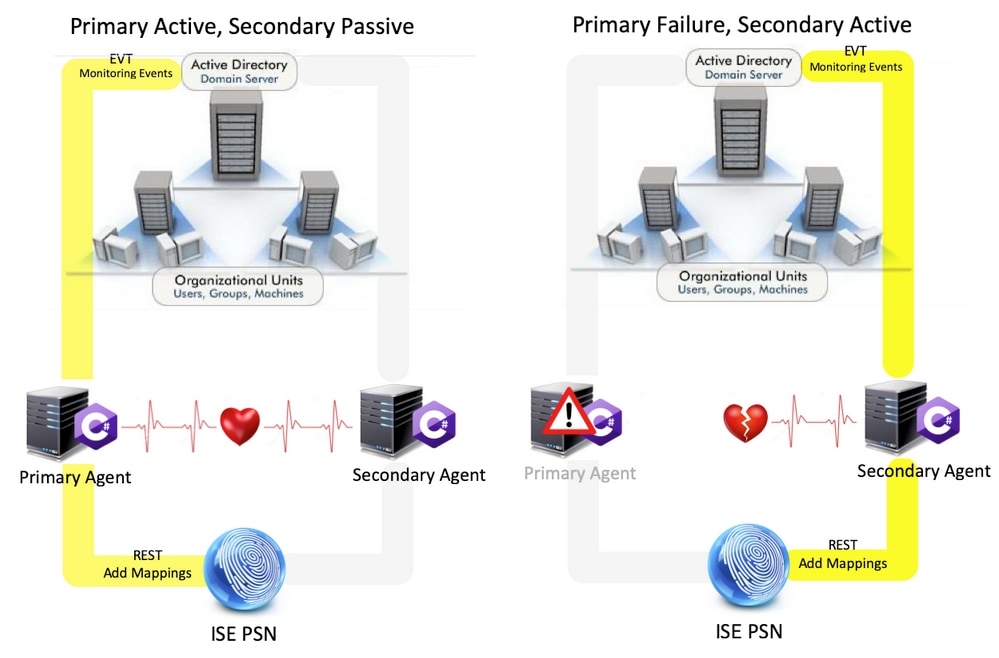
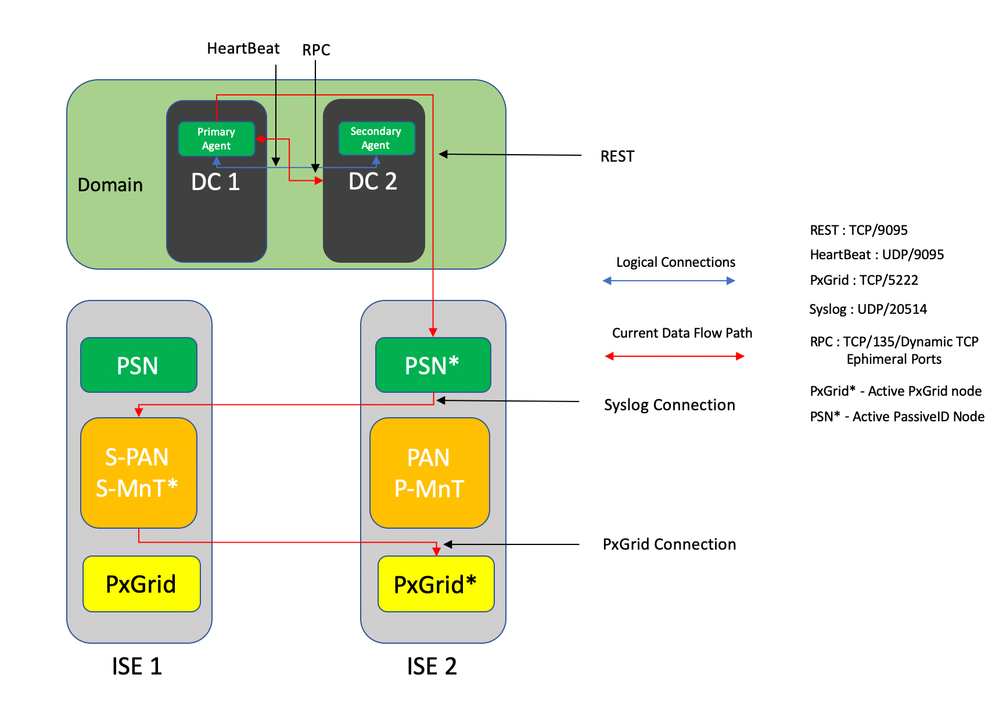
The original agent had no High Availability (HA) option, and if it is needed to do maintenance on the server where the agent was running or had an outage, logon events would be missed and features like Identity-based Firewall would see a loss of data during this period. This was one of the major concerns with the use of ISE PIC Agent prior to this release. From this release onwards, agents can work in High Availability. ISE uses UDP Port 9095 to exchange heartbeats between the agents to ensure High Availability. There can be multiple HA Pairs of Agents that can be configured to monitor different domain controllers.
Scalability
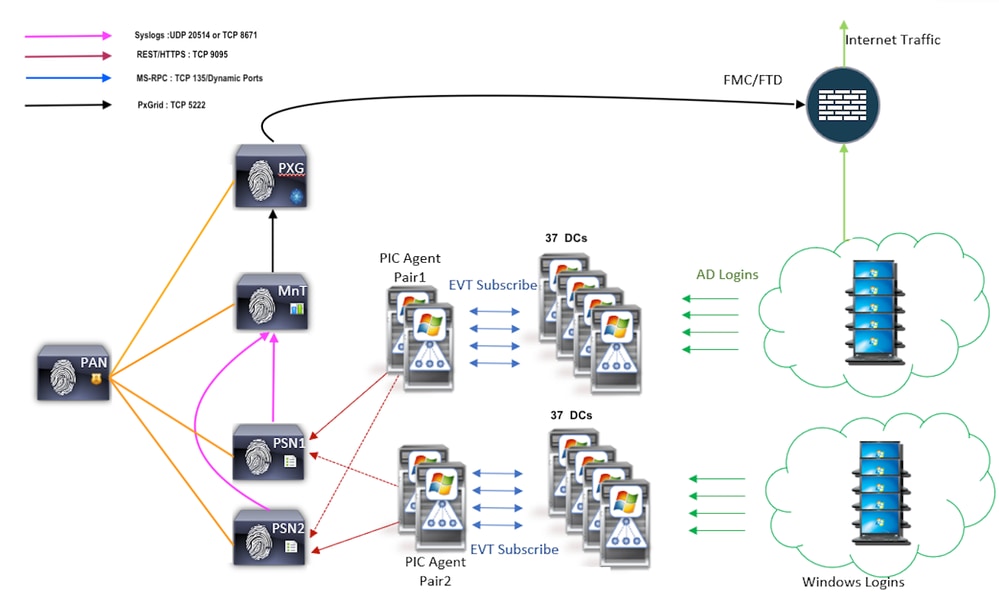
The new agent provides better support with increased scale numbers for a supported number of domain controllers and the number of events that it can handle. Here are the scale numbers that were tested :
- Maximum number of domain controllers monitored (With 2 pairs of Agents): 74
- Maximum number of Mappings/events tested: 292,000 (3950 events per DC)
- Maximum TPS tested: 500
Scale Test Setup Architecture
Historic Events Query
In case of Failover, or in case a service restart is done for the PIC-Agent, to ensure that no data is lost, events that are generated in the past for a configured amount of time are queried and sent to the PSN nodes again. By default, 60 seconds worth of past events from the start of the service are queried by the ISE to negate any loss of data during the service loss.
Less Processing Overhead
Unlike WMI which is CPU intensive under large scale or heavy load, EVT does not consume that many resources like WMI does. The scale tests showed a much-improved performance of the queries with the use of EVT.
Configure
Connectivity Diagram
Configurations
Configure ISE for PassiveID Agent
In order to configure PassiveID services, you must have the Passive Identity Services enabled on at least one Policy Service Node (PSN). A maximum of two nodes can be used for Passive Identity Services which function in Active/Standby mode of operation. ISE must also be joined to an Active Directory domain and only those domain controllers present in that domain can be monitored by Agents configured on the ISE. In order to join ISE to an Active Directory domain, refer to the Active Directory Integration Guide.
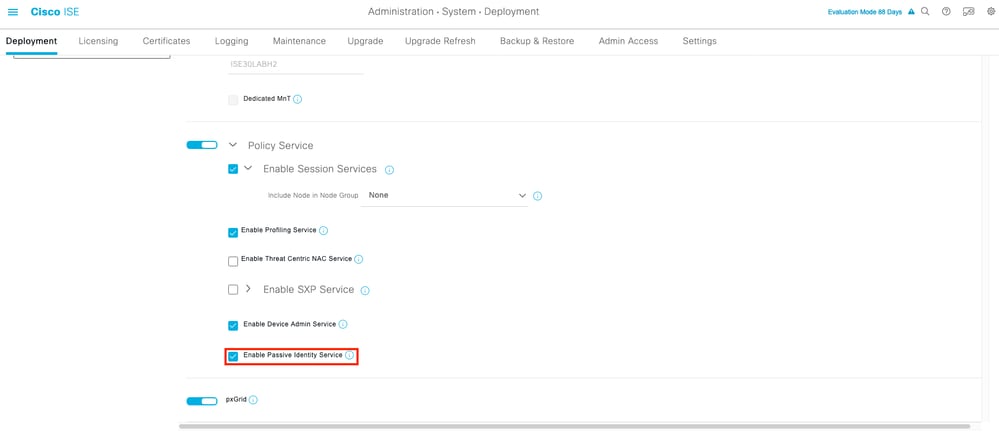
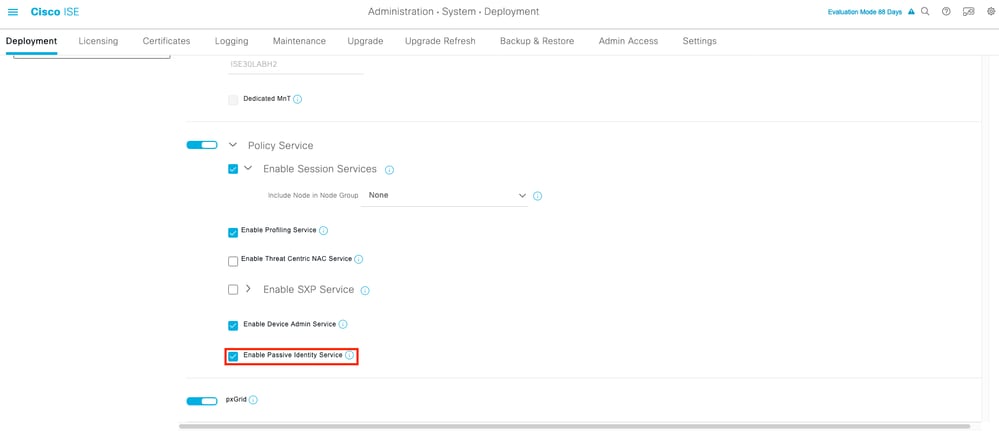
Navigate to Administration > System > Deployment > [Choose a PSN] > Edit to enable Passive Identity Services as shown here:
Navigate to Work Centers > PassiveID > Providers > Agents > Add to deploy a new Agent as shown here:
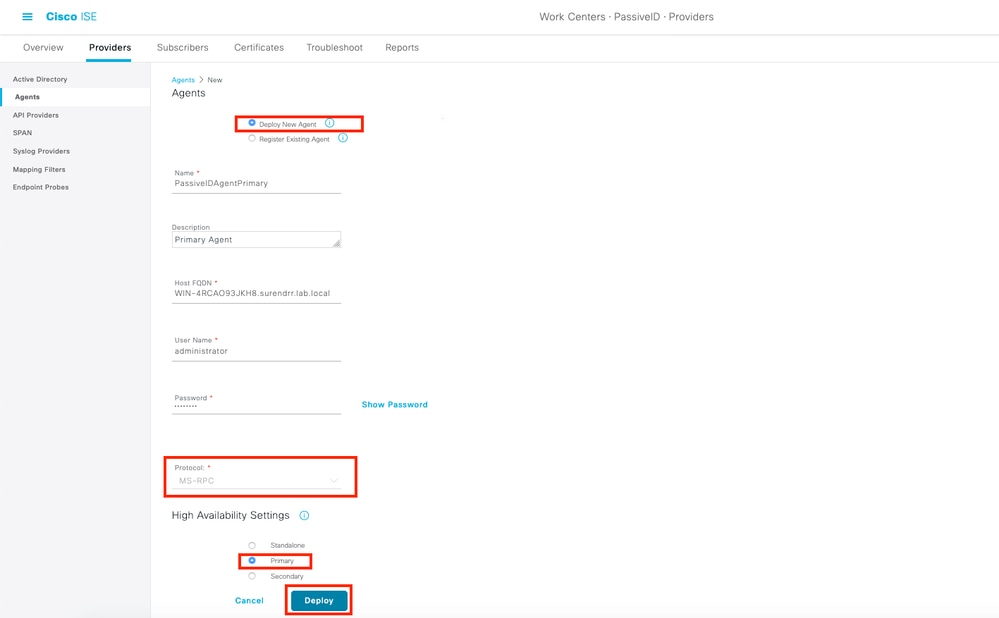
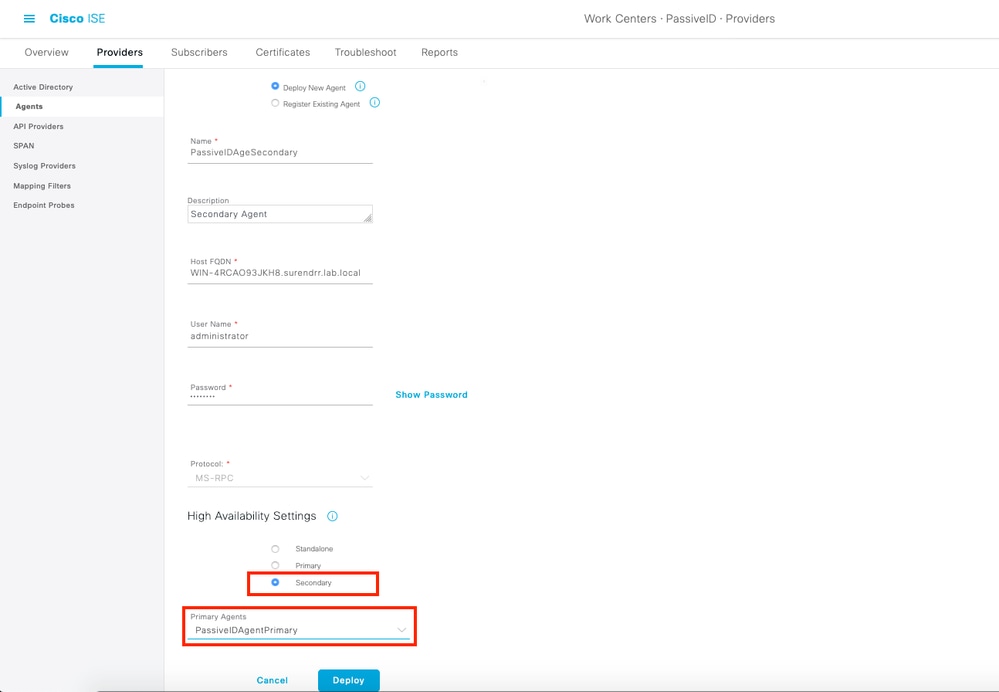
After a successful deployment, configure another agent on a different server, and add it as a secondary agent, and then its primary peer as shown in this image.
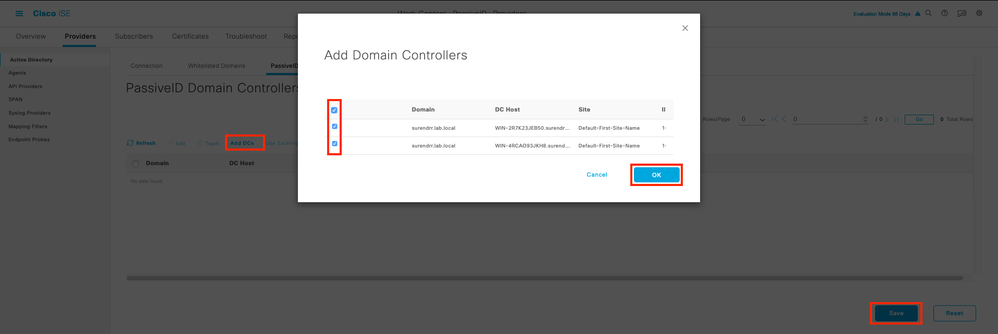
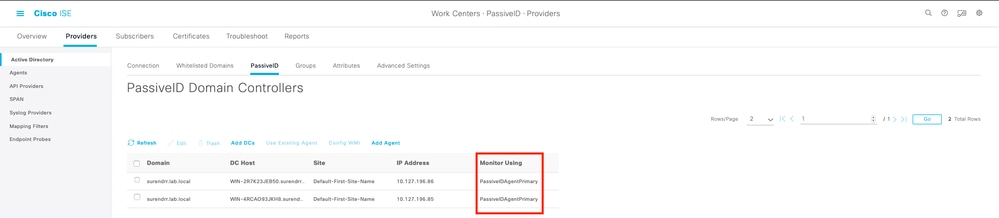
In order to monitor the domain controllers that use the agents, navigate to Work Centers > PassiveID > Providers > Active Directory > [Click on the Join Point] > PassiveID . Click Add DCs and choose the domain controllers from which the User-IP Mapping/events are retrieved, click OK, and then click Save to save the changes, as shown in this image.
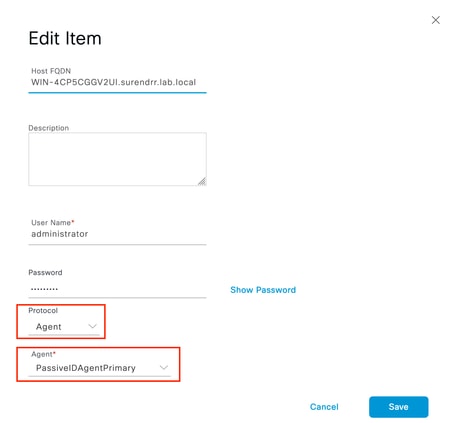
In order to specify the Agents which can be used to retrieve the events from, navigate to Work Centers > PassiveID > Providers > Active Directory > [Click on the Join Point] > PassiveID. Choose the domain controllers and click Edit. Enter the User Name and Password. Choose Agent, and then Save the dialog box. Click Save on the PassiveID tab to complete the configuration.
 Monitoring a Domain Controller
Understand PassiveID Agent Configuration File
The PassiveID Agent configuration file is located at C:\Program Files (x86)\Cisco\Cisco ISE PassiveID Agent\PICAgent.exe.config. The configuration file has content shown here:
<?xml version="1.0" encoding="utf-8"?>
<configuration>
<configSections>
<section name="log4net" type="log4net.Config.Log4NetConfigurationSectionHandler, log4net"/>
</configSections>
<log4net>
<root>
<level value="DEBUG" /> <!-- Logging Levels: OFF, FATAL, ERROR, WARN, INFO, DEBUG, ALL -->
<!-- This sets the Log level of the logs collected for the PassiveID Agent on the server on which it runs. -->
<appender-ref ref="RollingFileAppender" />
</root>
<appender name="RollingFileAppender" type="log4net.Appender.RollingFileAppender">
<file value="CiscoISEPICAgent.log" /> <!-- Do not modify this -->
<appendToFile value="true" />
<rollingStyle value="Size" />
<maxSizeRollBackups value="5" /> <!-- This number sets the maximum number of log files that are generated before they are rolled over -->
<maximumFileSize value="10MB" /> <!-- This sets the maximum size of each log file that is generated -->
<staticLogFileName value="true" />
<layout type="log4net.Layout.PatternLayout">
<conversionPattern value="%date %level - %message%newline" />
</layout>
</appender>
</log4net>
<startup>
<supportedRuntime version="v4.0"/>
<supportedRuntime version="v2.0.50727"/>
</startup>
<appSettings>
<add key="heartbeatFrequency" value="400" /> <!-- This number defines the heart beat frequency in milli seconds that run between the Primary Agent and the Secondary Agent if configured in a pair on the ISE -->
<add key="heartbeatThreshold" value="1000"/> <!-- This number defines the maximum time duration in milli seconds for which the Agent waits for heartbeats after which the other Agent is marked down -->
<add key="showHeartbeats" value="false" /> <!-- Change the value to "true" to see heart beat messages in the log file -->
<add key="maxRestThreads" value="200" /> <!-- Defines the maximum number of REST threads that can be spawned to send the events to the ISE. Do not change this value until and unless advised by Cisco TAC. -->
<add key="mappingTransport" value="rest" /> <!-- Defines the type of medium used to send the mappings to the ISE. Do not change this value -->
<add key="maxHistorySeconds" value="60" /> <!-- Defines the duration in seconds in the past for which the historic events need to be retrieved in case of a service restart -->
<add key="restTimeout" value="5000" /> <!-- Defines the timeout value for a REST call to the ISE -->
<add key="showTPS" value="false" /> <!-- Change this value to "true" to see the TPS of events that are recived and sent to the ISE -->
<add key="showPOSTS" value="false" /> <!-- Change this value to "true" to print the events that are sent to the ISE -->
<add key="nodeFailoverTimeSpan" value="5000" /> <!-- Defines the condition for threshold in milliseconds within which the number of errors which can occur in communication with the active PassiveID PSN node are counted for failover -->
<add key="nodeFailoverMaxErrors" value="5" /> <!-- Defines the maximum count of errors that are tolerated within the specified nodeFailoverTimeSpan before failing over to the standby PassiveID PSN node -->
</appSettings>
</configuration>
Verify
Verify PassiveID Services on the ISE
1. Verify if the PassiveID service is enabled on the GUI, and also marked running from the command show application status ise on the CLI of the ISE.
ISE PROCESS NAME STATE PROCESS ID
--------------------------------------------------------------------
Database Listener running 129052
Database Server running 108 PROCESSES
Application Server running 9830
Profiler Database running 5127
ISE Indexing Engine running 13361
AD Connector running 20609
M&T Session Database running 4915
M&T Log Processor running 10041
Certificate Authority Service running 15493
EST Service running 41658
SXP Engine Service disabled
Docker Daemon running 815
TC-NAC Service disabled
pxGrid Infrastructure Service disabled
pxGrid Publisher Subscriber Service disabled
pxGrid Connection Manager disabled
pxGrid Controller disabled
PassiveID WMI Service running 15951
PassiveID Syslog Service running 16531
PassiveID API Service running 17093
PassiveID Agent Service running 17830
PassiveID Endpoint Service running 18281
PassiveID SPAN Service running 20253
DHCP Server (dhcpd) disabled
DNS Server (named) disabled
ISE Messaging Service running 1472
ISE API Gateway Database Service running 4026
ISE API Gateway Service running 7661
Segmentation Policy Service disabled
REST Auth Service disabled
SSE Connector disabled
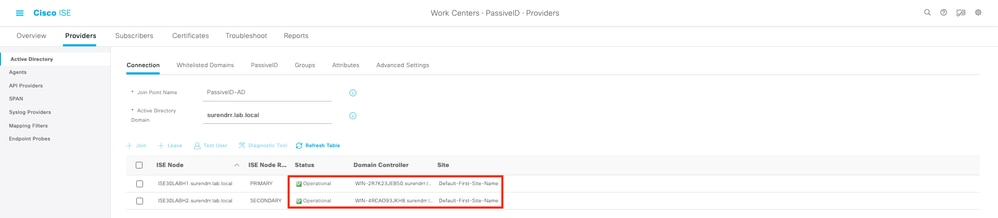
2. Verify if ISE Active Directory provider is connected to the domain controllers at Work Centers > PassiveID > Providers > Active Directory > Connection.
3. Verify if the required domain controllers are monitored by the Agent at Work Centers > PassiveID > Providers > Active Directory > PassiveID.
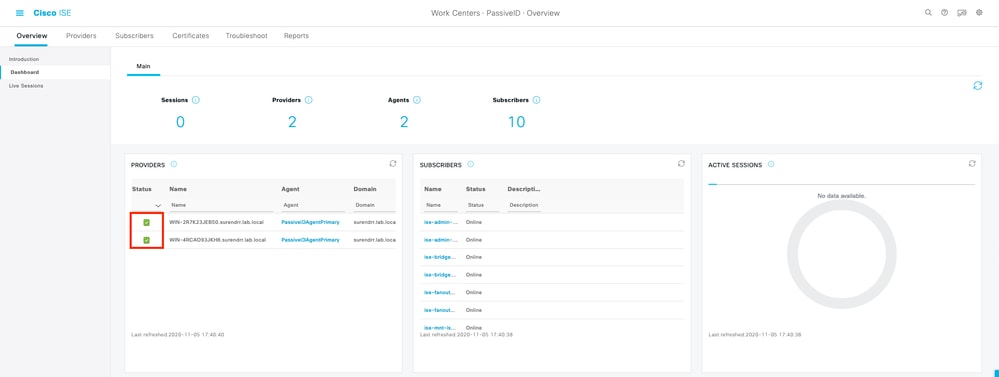
4. Verify if the status of the domain controllers being monitored is up. For example, marked green on the dashboard at Work Centers > PassiveID > Overview > Dashboard.
5. Verify live sessions are being populated when a windows logon is registered on the domain controller at Work Centers > PassiveID > Overview > Live Sessions.

Verify Agent Services on the Windows Server
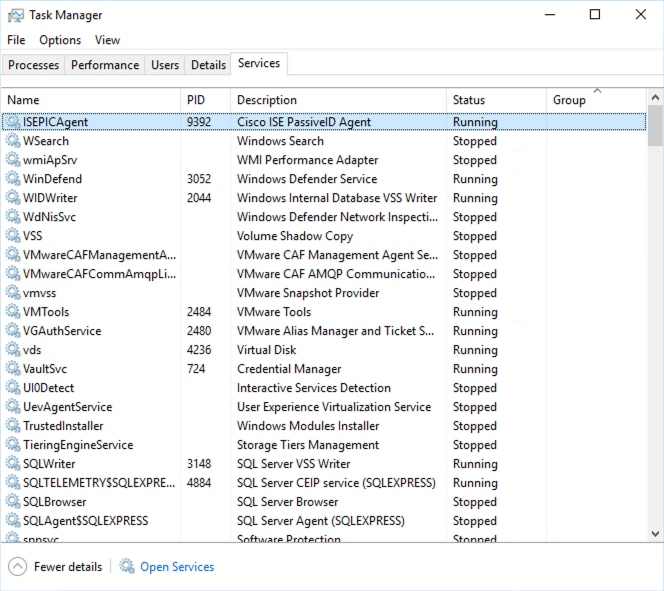
1. Verify ISEPICAgent service on the server where PIC Agent is installed.
Required Settings at the Windows AD Domain - Group Policy Objects (GPO)
1. For the ISE PIC Agent be able to read User logon and logoffs events entries, the account used can be a Service Account (with no password expire) and can be a regular domain account and member of Event Log Readers group
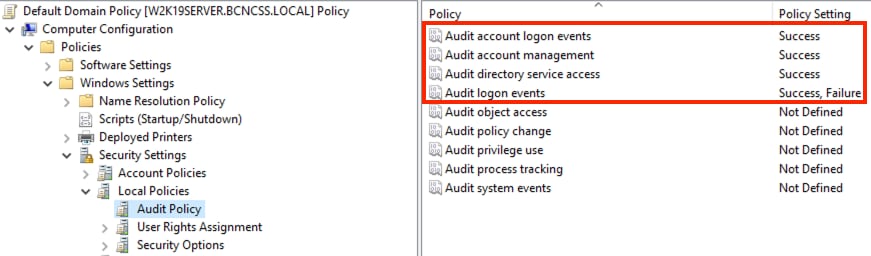
2.- At the Domain Policy, confirm these settings are set at:
Default Domain Policy (or the one the Customer is using for their Domain Machines) > Windows Settings > Security Settings > Local Policies > Audit Policy and enable this entries:
Some customers relies on the Advanced Audit Policy Configuration instead of using the Legacy Local Policies
.
If this is the case, set Advanced audit policies: In the Group Policy Management Editor. Expand Computer Configuration → Navigate to Policies → Navigate to Windows Settings → Navigate to Security Settings → Navigate to Advanced Audit Policy Configuration → Navigate to Audit Policies. Set these audit policies:
Account Management
· Audit Computer Account Management: Success
· Audit Distribution Group Management: Success
· Audit Security Group Management: Success
· Audit User Account Management: Success
DS Access
· Audit Directory Service Access: Success
Logon/Logoff
· Audit Logoff: Success
The Session entry at the ISE PIC can be seen inmediately, just after the user log in.
Revision History
| Revision | Publish Date | Comments |
|---|---|---|
3.0 |
20-Oct-2026
|
Recertification - Updated Alt Text, SEO, Machine Translation and Formatting. |
2.0 |
01-Aug-2024
|
Added Alt Text.
Updated Introduction, Machine Translation and Formatting. |
1.0 |
10-Dec-2020
|
Initial Release |

 Feedback
Contact Cisco
- Open a Support Case

- (Requires a Cisco Service Contract)